There are a variety of different versions of control systems, however, what we’ll talk about will be “git” a distributed version control system, but what exactly is the distributed system of version control system(DVSC)? In DVSC the code or files are distributed to every developer who is working on the same project. Each developer has their own copy of the code in their working directory. It is put on a central server, where every developer can request the central server for updates to the base of code or update the local folder in the event that the central server has been updated.
1. Local as well as a remote repository
These two terms are crucial to git’s remote and local repository. The repository is a directory or the folder in which the version control software will store all versions and other information about the project. Local Repository is one that is located on your personal computer’s working directory. The remote repository is one located placed on the central server, or any remote server.
2. Basic Work-flow for git
A straightforward workflow for git is shown in the following diagram.
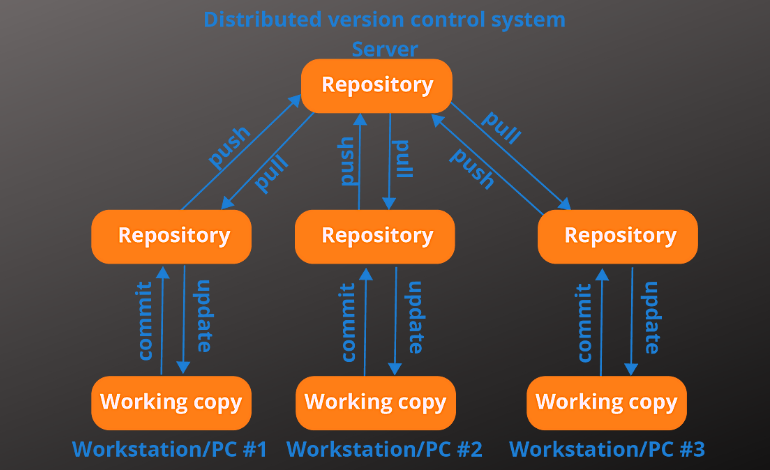
There are developers working on an identical project. Each has their own working copy distributed that is part of the work. Each has its local repository, as well as an external repository that they push their changes, or pull changes from the remote repository to their local. Each developer can make modifications to their files, and then add those files to git for tracking (staging area) commit any changes to their local repository, and then transfer those changes to the remote repository. This cycle is repeated, however, if your remote repository is behind your changes. this means another developer has to make changes to the remote repository, it will not permit you to push local changes to the remote repository. In this scenario, we need to first make sure that our local repository is updated to reflect the changes being pushed to the remote repository by another developer within the same program. So we first need to pull any changes, change our local repository before pushing our changes to the remote repository.
3. Git basic operations
These are a few of the most fundamental commands used by git to help us begin the process of creating versions of our code. We will be using the command line to carry out these actions.
- Initialize:The word “git” is a reference to “start of an operation”. This is the first step in learning about Git. We will start by establishing (creating an account locally ) to begin versioning our project.
“git init”
is the command that is used to create a local repository. It is the command used to create a. Following the execution of this command, is the time to create a
.git
A hidden folder is created within the working directory of our project. It will house all the details related to versioning as well as the metadata associated with our project.
- Add:After creating a local repo, the next step is to move all files into a staging area, where we can add the file to git and git will begin tracking the files. To track files we make use of
Add git .
This command is used to add all the files.
Git add file_name to file
can be used to add the individual files using a call to names of files. To verify if the files are tracked we make use of the command
“git status”
to determine if the file is tracked or not in the staging area. If it is, we can move on to the next step.
- Commit:at present, we’ve made all changes available to the Git repository. git is now beginning to search for changes. Now it’s the moment to submit(commit) these modifications to the local repository.
Git commit -m “some changes concerning the file’
This command is used to commit all changes to the file using an individual message.
- Push:After having everything localized it’s time to push (
“Local repository push to the remote repository
) all the changes are made to the central server.
git remote remote remote repo-add origin
After executing this command, our local repo will then connect to the remote repo, however, the changes we make are not published to the remote server. so for publishing changes, we employ
git push -u origin master
This will now transfer all changes to the central server. Don’t be misled with the terms “origin” and “master”. The term ‘origin’ is used to describe the name for the remote repository, while the master is the default git branch. Branching is also a function of git, but it’s not relevant at the moment since we are discussing the fundamental git operations.
- Pull:let’s say the two of you working in an identical remote repository. He made a few changes to your remote repository, and now you require those changes pushed through your buddy to the local repository.
Git fetch
this command will pull these changes but will not add these files to the local repo until after you add the changes with your local repo using
Git merge
command. There is another command that is
git pull
This will retrieve and merge changes at the same time.
It is a basic introduction to git. I will write more on Git and its features that are more advanced.


Leave a Reply