In this tutorial, I will show you how to create form wizard and validation in jQuery, its a simple snippet created with Bootstrap and jquery to make a simple long from in steps to improve data collection process and beautify webpage.
In this tutorial I have used jQuery and Bootstrap.
First of all include your libraries:
<script src="https://ajax.googleapis.com/ajax/libs/jquery/3.1.1/jquery.min.js"></script>

<link href="https://maxcdn.bootstrapcdn.com/bootstrap/3.3.7/css/bootstrap.min.css" rel="stylesheet">

<script src="https://maxcdn.bootstrapcdn.com/bootstrap/3.3.7/js/bootstrap.min.js"></script>
Above libraries required to run this snippet.
Basic HTML form with steps:
We created 3 steps of our firm step tabs setup like this
            <div class="stepwizard">

                <div class="stepwizard-row setup-panel">

                    <div class="stepwizard-step">

                        <a href="#step-1" type="button" class="btn btn-primary btn-circle">1</a>

                        <p>Account Details</p>

                    </div>


                    <div class="stepwizard-step">

                        <a href="#step-2" type="button" class="btn btn-default btn-circle" disabled="disabled">2</a>

                        <p>Career</p>

                    </div>


                    <div class="stepwizard-step">

                        <a href="#step-3" type="button" class="btn btn-default btn-circle" disabled="disabled">3</a>

                        <p>Social Media</p>

                    </div>


                </div>

            </div>
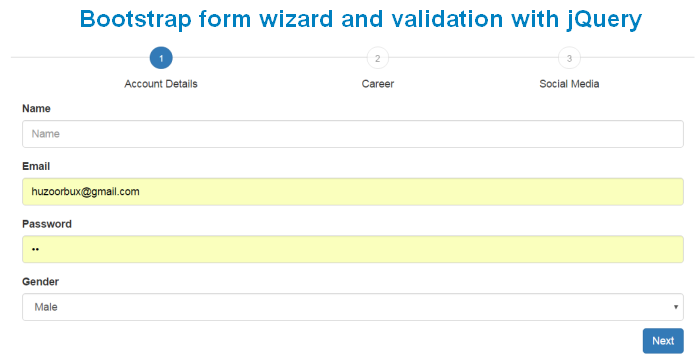
Above HTML create 3 steps tab above the form like this.

This HTML contain form elements in each step:
               <div class="row setup-content" id="step-1">

                    <div class="col-xs-12">

                        <div class="col-md-12">

                            <h3> Account Details</h3>

                            <!-- content go here -->

                            <button class="btn btn-light btn-block nextBtn pull-right" type="button" >Next</button>

                        </div>

                    </div>

               </div>


               <div class="row setup-content" id="step-2">

                    <div class="col-xs-12">

                        <div class="col-md-12">

                            <h3> Career</h3>

                            <!-- content go here -->

                            <button class="btn btn-light btn-block nextBtn pull-right" type="button" >Next</button>

                        </div>

                    </div>

               </div>


               <div class="row setup-content" id="step-3">

                    <div class="col-xs-12">

                        <div class="col-md-12">

                            <h3> Social Media</h3>

                            <!-- content go here -->

                            <button class="btn btn-light nextBtn btn-block pull-right" type="submit">Finish!</button>

                        </div>

                    </div>

               </div>
Jquery used to enable navigation and validation of form:
<script type="text/javascript">

$(document).ready(function () {

    var navListItems = $('div.setup-panel div a'), // tab nav items

            allWells = $('.setup-content'), // content div

            allNextBtn = $('.nextBtn'); // next button


    allWells.hide(); // hide all contents by defauld


    navListItems.click(function (e) {

        e.preventDefault();

        var $target = $($(this).attr('href')),

                $item = $(this);


        if (!$item.hasClass('disabled')) {

            navListItems.removeClass('btn-primary').addClass('btn-default');

            $item.addClass('btn-primary');

            allWells.hide();

            $target.show();

            $target.find('input:eq(0)').focus();

        }

    });

    // next button

    allNextBtn.click(function(){

        var curStep = $(this).closest(".setup-content"),

            curStepBtn = curStep.attr("id"),

            nextStepWizard = $('div.setup-panel div a[href="#' + curStepBtn + '"]').parent().next().children("a"),

            curInputs = curStep.find("input[type='text'],input[type='email'],input[type='password'],input[type='url']"),

            isValid = true;

           // Validation

        $(".form-group").removeClass("has-error");

        for(var i=0; i<curInputs.length; i++){

            if (!curInputs[i].validity.valid){

                isValid = false;

                $(curInputs[i]).closest(".form-group").addClass("has-error");

            }

        }

        // move to next step if valid

        if (isValid)

            nextStepWizard.removeAttr('disabled').trigger('click');

    });


    $('div.setup-panel div a.btn-primary').trigger('click');

});

</script>
Some CSS to organize form step tabs:
<style type="text/css">

.form-control {

    height: 37px;

}

.stepwizard-step p {

    margin-top: 10px;

}


.stepwizard-row {

    display: table-row;

}


.stepwizard {

    display: table;

    width: 100%;

    position: relative;

}


.stepwizard-step button[disabled] {

    opacity: 1 !important;

    filter: alpha(opacity=100) !important;

}


.stepwizard-row:before {

    top: 14px;

    bottom: 0;

    position: absolute;

    content: " ";

    width: 100%;

    height: 1px;

    background-color: #ccc;

    z-order: 0;


}


.stepwizard-step {

    display: table-cell;

    text-align: center;

    position: relative;

}


.btn-circle {

  width: 30px;

  height: 30px;

  text-align: center;

  padding: 6px 0;

  font-size: 12px;

  line-height: 1.428571429;

  border-radius: 15px;

}

</style>
That’s all I hope you like it a complete Demo and source code for download available with this tutorial.
If you face any difficulty please feel free to comment below we love to help you. If you have any feedback suggestion then please inform us by commenting.

Leave a Reply